Integrating Checkly in GitLab CI
Using the CLI in a CI/CD pipeline
We’ve optimized the Checkly CLI to work in any CI/CD workflow. Here are the basics you need to know that will come in handy when adapting the examples we give you to your own, specific setup.
- For authentication, make sure to set the
CHECKLY_API_KEYandCHECKLY_ACCOUNT_IDparameters as environment variables in your CI/CD platform. - Set the reporter you want to use for the
testcommand using the--reporterflag, i.e.--reporter=dot. - To store a test session with full logging, traces and vides, set the
--recordflag for thetestcommand. - Use the
--forceflag on thedeployand / ordestroycommands to skip the normal confirmation steps.
When using the --record flag, the CLI will attempt to parse git specific information from
the environment to display in the recorded test session as metadata. However, you can also set these data items specifically
by using environment variables.
| item | auto | variable | description |
|---|---|---|---|
| Repository | false | repoUrl in checkly.config.ts or CHECKLY_REPO_URL |
The URL of your repo on GitHub, GitLab etc. |
| Commit hash | true | CHECKLY_REPO_SHA |
The SHA of the commit. |
| Branch | true | CHECKLY_REPO_BRANCH |
The branch name. |
| Commit owner | true | CHECKLY_REPO_COMMIT_OWNER |
The committer’s name or email. |
| Commit message | true | CHECKLY_REPO_COMMIT_MESSAGE |
The commit message. |
| Environment | false | CHECKLY_TEST_ENVIRONMENT |
The environment name, e.g. “staging” |
Check the CLI command line reference for more options.
Make sure to set your
CHECKLY_API_KEYandCHECKLY_ACCOUNT_IDas secrets in your GitLab CI settings before you get started.
A Basic pipeline example
Create a new .gitlab-ci.yml file in your repo, or add the steps and stages from the example below to your existing file.
This pipeline is “branch aware” and treats the main branch as the production branch. This means checks are only deployed
to Checkly after they are ran against production (after merging to main) and the checks passed.
image: node:latest

# define your stages to deploy your app, run tests and then deploy the tests as monitors.
stages:
  - deploy
  - checkly-test
  - checkly-deploy

# Set the necessary credentials and export variables we can use to instrument our test run. Use the ENVIRONMENT_URL
# to run your checks against staging, preview or production.
variables:
  CHECKLY_API_KEY: "$CHECKLY_API_KEY"
  CHECKLY_ACCOUNT_ID: "$CHECKLY_ACCOUNT_ID"
  CHECKLY_TEST_REPO_BRANCH: "$CI_COMMIT_BRANCH"
  CHECKLY_TEST_REPO_URL:  "$CI_PROJECT_URL"

deploy-app:
  stage: deploy
  script:
    - echo "add your deployment logic here"
    # - ENVIRONMENT_URL= <add some command to extract a branch specific url to target

# Set a different environment name based on the branch you are testing against.
e2e-staging:
  stage: checkly-test
  cache:
    key:
      files:
        - package-lock.json
    paths:
      - node_modules
  variables:
    CHECKLY_TEST_ENVIRONMENT: review/$CI_COMMIT_REF_SLUG
  script:
    - npm ci
    - npx checkly test --record
  except:
    - main

e2e-production:
  stage: checkly-test
  cache:
    key:
      files:
        - package-lock.json
    paths:
      - node_modules
  variables:
    CHECKLY_TEST_ENVIRONMENT: "production"
  script:
    - npm ci
    - npx checkly test --record
  only:
    - main

monitor:
  stage: checkly-deploy
  cache:
    key:
      files:
        - package-lock.json
    paths:
      - node_modules
  needs: ["e2e-production"]
  script:
    - npx checkly deploy --force
  only:
    - main
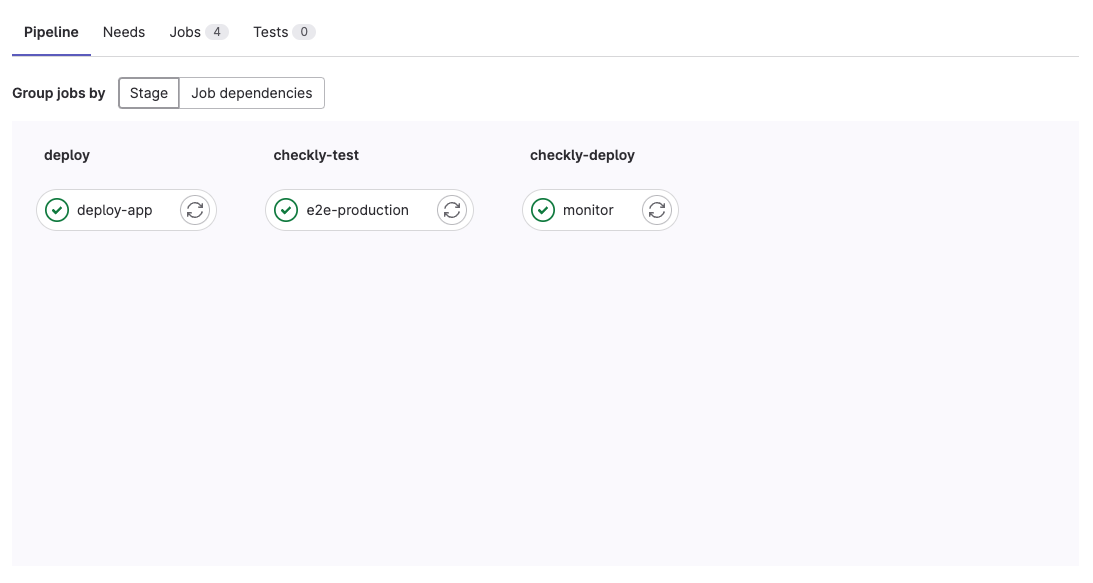
The above example creates three stages:
- deploy: this is where your application specific deployment logic happens
- checkly-test: after the deploy stage, we run the
checkly testcommand. We run two different jobs based on whether we are on themainbranch of a different, feature branch so we can set a different environment. - checkly-deploy: the last stage, that only runs on
mainis to deploy the checks to Checkly. Note that this stage only runs when the previouse2e-productionjob is successful.
The output in the GitLab CI CI/CD -> Pipelines tab will now look similar to this:

Last updated on December 11, 2024. You can contribute to this documentation by editing this page on Github